Category: Guide

  • Frigidaire Dishwasher not Draining: (7-Working-Fixes)

    Frigidaire Dishwasher not Draining: (7-Working-Fixes)

    Most dishwasher comes with their issues. If you use a Frigidaire dishwasher, a very common problem is the residual water getting stuck in the washer. This in turn causes your dishwasher to give out an unpleasant smell.

    If this is your first time experiencing this. You don’t need to fret. The issue you are facing is your Frigidaire dishwasher not draining.

    This issue is usually caused by food substances getting stuck on the drain hose or probably the drain pump is faulty.

    But, issues connected to your Frigidaire Dishwasher not draining are not limited to that. And in the article below I will be walking you through the easy steps you can take to repair it yourself instead of spending on a repair service to get it fixed.

    Let proceed.

    How to Repair Frigidaire Dishwasher not Draining

    If your Frigidaire dishwasher is giving Off an Unpleasant smell after opening it. Or maybe after doing a series of checks, you can see residual water in the Washer. Then the first thing you should check is the drain hose

    1. Check for a blocked Drain Hose

    Your Drain hose can be blocked by food remains or by the formation of kinks which usually stops these water residues from flowing to the garbage disposal.

    If you are faced with this, the quick solution is to remove the drain hose from the pump and clean it. You can decide to blow the top part of the Drain hose or use a hanger to clear out the blocked hose.

    In hindsight, this is usually caused when your food chopper is faulty, If it is you might need to replace that so as not to experience a blocked drain hose again.

    In addition to all that. In a situation where you are having too much kink in your drain hose, a replacement would be your best bet.

    if after trying this you are stick stuck with your Frigidaire Dishwasher not draining. proceed to the next step.

    2. Check for a Clogged Drain Filter

    Sometimes, the drain filter might be the one clogged with food debris. The filter is usually at the under part of your Frigidaire dishwasher. An easy way to figure this out is if you notice that the filter is heavier than normal.

    To resolve this issue. Remove the Drain filter completely and look cleaning item you can insert into the filter. A good example is a brush, Then use it to remove anything clogging the drain filter.

    Doing this should take care of your Frigidaire Dishwasher not draining, However, if after trying this you are still stuck with your Frigidaire Dishwasher not draining, proceed to the next step.

    3. Check the Drain valves

    The Drain Valve is the less likely issue while your Frigidaire Dishwasher isn’t draining. However, you can’t write it off since your drain valve is blocked with food matter and it could cause a backflow.

    To check if your Drain Valve isn’t the issue, simply locate it close to the motor

    Once you see, it, check if there is any material or food debris stuck to it. If anything is blocking it, Simply clear them off,

    if after trying this you are still stuck with your Frigidaire Dishwasher not draining, proceed to the next step.

    4. Check for a Blocked Garbage Disposal

    Your Garbage disposal has one Job, which is to store up food remnant after it has passed through the food chopper down to the disposal.

    However, your Garbage disposal isn’t made to store up water since it drains off any residual water out of the system.

    Now, if you are having issues with the garbage disposal. It is usually due to large particles or obstructions which sometimes can be caused by a solid plug.

    If you are a using new Frigidaire dishwasher, try removing the plug firstly to see if the drainage stops. If it doesn’t. Then it might be a large food particle blocking water from draining away from the System.

    If you spot any large particles, then you might need to check your food chopper.

    if after trying this you are still stuck with your Frigidaire Dishwasher not draining, proceed to the next step.

    5. Faulty Drain Pump

    Looking at all the issues that could give way to your Frigidaire dishwasher, not draining. A faulty Drain Pump is one of the least possible causes for it, that is why I have decided to place it among the last set of things you should check for.

    To quickly identify this issue, You might hear some humming noise when you start the system

    If you have a faulty pump, the impeller might drain the water from the dishwasher which isn’t good. However, another common issue is a blocked pump. Probably, there is an odd object blocking the pump from functioning well.

    To resolve this,

    Disconnect the drain hose, with other connected components that are faulty. Remove your drain pump from the dishwasher by unscrewing them, while also pulling out its wire connector.

    After removing the pump from the system, clean off any debris or object inside the pump.

    if after doing this, the draining persists then you might have to check your impeller. Stuck debris is easy to remove from the impeller with an easy scrape.

    if after trying this you are still stuck with your Frigidaire Dishwasher not draining, proceed to the next step.

    6. A Faulty Timer

    You can easily locate the Timer on the Frigidaire Timer. The timer has one job which is to control the time a cycle goes for while also draining the solenoid.

    Even though a timer is the last among the bucket list of things you should check if your Frigidaire dishwasher is not draining. However, it is a problem you cannot write off. So if you have a faulty timer. It is a safe and recommended practice to replace with another timer as it could cause the Frigidaire Dishwasher to not drain.

    if after trying this you are still stuck with your Frigidaire Dishwasher not draining, proceed to the next step.

    Your Strainer could also result in your Frigidaire dishwasher not draining. However, it is very easy to resolve. As you can easily remove the debris or particles stopping water from flowing into the strainer by using a spoon to clear them off.

    After trying out all these steps, your Frigidaire dishwasher draining issues should have stooped. However, if you haven’t been able to resolve it, you might have to call a repairman to help you deal with it.

    After carrying out these troubleshooting steps you can reset your Frigidaire Dishwasher. if you are unsure about how to do that check here.

    Frigidaire Dishwasher Drain Pump Test

    The first step to quickly figure out if the Dishwasher pump is having any issues is if it starts oozing a humming sound. If you hear any strange sounds here is a show you can easily test your Drain Pump

    First and foremost, you have to remove your Dishwasher pump from the whole system by unscrewing it from the drainage pipes.

    After removing the pump from the system, clean off any debris or object inside the pump.

    if after doing this, the draining persists then you might have to check your impeller. Stuck debris is easy to remove from the impeller with an easy scrape.

    Frigidaire Dishwasher Force Drain Cycle

    If you own a Frigidaire dishwasher here is how you Force a Drain cycle so that you can restart a clean cycle.

    • Press the cancel button, to cancel the current wash cycle

    Once the wash cycle is cancelled the dishwasher will begin a 90-second drain cycle to clear out any water residue inside the dishwasher.

    Frigidaire Dishwasher water pooling in the bottom

    If the water at the bottom of your dishwasher is pooling at the bottom it only means one thing; It is not draining. If you are faced with this these are the first two things you have to check for before proceeding to the troubleshooting steps which will be listed below.

    Verify that the drain hose needs to be placed such that it creates a high loop and then coils down to connect with the sink outlet.

    However, if that isn’t the issue, then you should disconnect the dishwasher drain hose where it is directly connected to the disposal site. Probably, the water in the garbage disposal is at its maximum.

    If none of these works you should try out the troubleshooting steps listed below

    Frigidaire Dishwasher troubleshooting

    Below are the few easy-to-do troubleshooting steps anyone can do if your Frigidaire dishwasher not draining

    • Check for a blocked Drain Hose
    • Check for a Clogged Drain Pump
    • Faulty Pump
    • Check for a blocked Strainer
    • Replace your Timer if it is faulty
    • Check the Drain valves
    • Check your Garbage disposal

    Frigidaire Dishwasher drain valve

    The job of a drain valve is to allow water coming from the drain pump to flow to the drain hose while stoping the water from flowing back into the dishwasher

    If the drain valve is faulty, it can cause issues such as, your frigidaire dishwasher not draining or leaking.

    A faulty Drain Valve needs a replacement. You can get one on amazon

    Frigidaire Dishwasher not draining and leaking

    If your Frigidaire dishwasher is not draining but you are experiencing leaks. It’s usually caused by a faulty Drain Valve or the drain hose is loose. A Loose Drain hose is easy to tighten but a faulty drain valve needs a replacement.

    Since you have figured out some common ways to deal with your Frigidaire dishwasher not draining, below are some frequently asked questions regarding the Frigidaire dishwasher

    How to Drain Frigidaire Gallery Dishwasher

    Draining your Dishwasher can easily be done by cancelling a wash cycle. and waiting for a few moments for the water to drain out. However, if the water isn’t draining or pooling at the bottom, you can scroll through the troubleshooting steps listed above to resolve it.

    What would cause a Frigidaire dishwasher not to drain?

    There are quite a handful of issues why your Frigidaire dishwasher won’t drain. Below are the reasons why.

    • A blocked drain hose
    • Blocked drain valve
    • Clogged garbage disposal
    • Blocked or faulty pump
    • Clogged strainer

    How do I force my Frigidaire dishwasher to drain?

    You can do that by cancelling a wash cycle by pressing “cancel” while waiting for a few moments for the drainage to start.

    Conclusion

    By now, you should have been conversant with how to deal with your Frigidaire Dishwasher not draining. These issues are common with a dishwasher, like Whirlpool or Kenmore since they are not problem free.

    However, if you are not able to resolve this issue on your own, you can contact Frigidaire customer support for a service repair by checking here or by simply dialling this number 1-800-374-4432.

  • GE Dishwasher Not Drying -(Updated-Fix)

    GE Dishwasher Not Drying -(Updated-Fix)

    There are a lot of great reviews when it comes to the GE dishwasher. While some believe it comes with great aesthetics and it has adjustable racks to fits different types of unusual dishes, some users still feel the GE is one of their worst buying decision.

    The thing is, all electronic equipment such as microwaves, a Freezer, Washers, etc, all come with issues.

    But, in this article, I am going to be focusing on the GE dishwasher and how to resolve your GE dishwasher not drying.

    If you are experiencing this and you can’t get a hang of it, read through this article because I will be walking you through all the easy steps anyone can do to resolve a GE dishwasher not drying.

    Let’s proceed.

    How to Troubleshoot GE Dishwasher not Drying

    Before you proceed to call a repairman or get a replacement part, there are some simple steps you can carry out to figure out what exactly is causing your GE dishwasher not to dry.

    Below are some things you ought to check starting from the simple ones to the intense ones. Let’s start

    Check through your Dish Placement

    In scenarios like this, You will experience that some of the utensils are dry while some aren’t. If that is the case, you should be sure to adjust the placement of those that aren’t dry

    If the plates are wrongly placed or maybe you are not leaving some space between the dishes for airflow, they could cease to dry. Anyway, you don’t need to fret as I will be showing you how you can resolve that

    Solution

    Since some plates or utensils are not dry, here is a better way to place them

    • Place dishes that dry faster on the top rack.
    • Ensure there is some distance in between each dishware.
    • Avoid stacking or nesting too many dishes at once

    Check for Heated Dry Setting

    There are a series of dishwasher brands/models, and they all work differently. For example, some dishwashers might not use heated dry to conserve energy while some use it.

    If your rinse aid dispenser isn’t working properly or your Washer suddenly stops drying here is how you can resolve it

    Solution

    All you have to do is to press the “heated/Dry” button to boost the drying performance

    Are you using a Hot water Cycle?

    Depending on the model of dishwasher you are using, another option you can check for is the Hot water cycle.

    If you are using a Hot water cycle that uses hot water as compared to using cold water. You are likely to end with dry plates.

    Anyway, if you aren’t using the Hot water cycle here is how to do it.

    Solution 

    Try running your faucet to clear cold water from the hot water line before starting your GE dishwasher.

    If your GE dishwasher not drying issues persist, Check the next step below

    Not Using A Dishwasher Rinse Aid

    Among other reasons, if you are not using the correct amount of rinse aid it could result in your GE dishwasher not drying. The reason is simple. The rinse aid is a drying agent that changes the shape of the water droplet coming from the plates so that they flow more easily.

    Solution

    To resolve this, check if the rinse aid is full. If it isn’t, fill it up.

    However, if the rinse aid is full, check if you can see any form of discolouration.

    At worst, it’s either the dispenser is dirty or the cap is damaged, if it’s dirty, you can clean it, but a damaged cap would require a replacement

    Now, let’s proceed to some Advanced Issues you might have to check to resolve your GE dishwasher not drying.

    Faulty Heating Element

    The drying process requires the heating element to heat the water left on the plates after washing them. If the heating element is not working correctly. The plates might either take a longer time to dry or might not dry. Also, your plate could come out dirty

    Solution

    So if you are experiencing a longer dry time. You can get the services of a repairman to check for the heating element to ensure it’s not faulty.

    However, if the heating element isn’t faulty try the next troubleshooting steps below

    Check the Vent

    During a dry cycle, your dishwasher vent releases hot air. In a scenario where the Vent has not properly opened the esteem won’t be able to escape to dry off your plate.

    In this scenario here is what you can do

    Solution

    Inspect the vent and clear off any debris that may be restricting airflow. In a scenario where the Vent isn’t opening, then it needs a replacement

    GE dishwasher not drying flood switch

    In cases like this, one of the things you would notice is the heating cycle that is supposed to dry the dishes isn’t working. , Maybe you’ve checked the heating element and the Vent and you notice that there are all okay. The flood switch might be faulty.

    Solution

    To resolve this, you need to get a replacement apart from your flood switch and you might also need to get the services of a repairman for that if you are unsure of how to do that.

    GE Dishwasher drying cycle

    The drying cycle job is to ensure all the plates and utensils in the rack are dry, To get a faster drying time here are some tips you can use

    • Ensure the water going into the dishwasher is 120 degrees F or higher.
    • Make use of a rinse aid by filling the rinse tank frequently since it accelerates the drying process
    • Also, make sure you are using the Heated Dry Option

    BY now, you should have been well versed on how to tackle your GE dishwasher not drying. If yes, below are some commonly asked questions from other GE users.

    Why is my GE Dishwasher not getting hot?

    One of, the reasons why your GRE dishwasher isn’t going hot is usually coming from the heating element of the flood light. If you are not experienced in repairing electronic devices. You should call a repairman to get it checked for you.

  • How to Blur Photo Background on iOS

    How to Blur Photo Background on iOS

    With your iPhone Photos App, you can blur unwanted parts from a photo taken on or outside your iPhone or from a screenshot. The iPhone App depth control or Natural Light gives mandate over photo background blurriness.

    So, if you are struggling to blur your iPhone background on your iPhone without using a third-party app here is a guide. In this article, you will learn how to blur photos on iPhone and the photos’ background without using an app.

    Blurring your iPhone photos or screenshots will make the background invisible when you share the edited image or screenshot with a blurred background across your device. This is, however, different from how to blur people’s faces in photos on iPhone.

    How to Blur Photos on iPhone

    Phone allows you to blur photo backgrounds on your iPhone and blur people’s faces from a group photo on your iPhone using the iPhone Photos App Depth Control feature if you are using an iPhone 7 while you may see natural light on the iPhone 12 Pro Max. This is a cool feature on your iPhone to cover what you don’t want people to see in your photos or if the photo carries too much information.

    You can also use the blur effect on your iPhone if you want to draw attention to a particular part of the photo or screenshot so that the photo background will not cause distraction from the point of attention.

    • Open the “Photos App” on your iPhone. You can see the “Photos App” on the “Home Screen” or “App Library.”
    • Open the “Photo” you take in “Photo Mode” or take a new photo in “Photo Mode” with the background you want to blur.
    • If you see the “Portrait Effect” on the photo, hit “f” at the top of the screen.
    • Tap on the “Depth Control Slider” to increase the blurriness on the background or use it to decrease the blurriness. You simply need to use the Depth Control Slider to how deep you want to background blur to look.

    How to Blur People’s Faces in Photos on iPhone

    You can blur people’s faces in Photos on your iPhone using the blur effect. However, the quickest way to achieve this is while taking the photo. You can blur out the person from the photo before taken. However, if you have taken the picture but you still want to blur the person you can still do that with your iPhone.

    Blur People’s Faces while taking the Photo

    • Open the “Camera App” on your iPhone. You can find this on the Home Screen or check through the App Library. To ease the stress of searching through the App Library, you can use the Spotlight search to search for it.
    • Tap on “People” on the “Camera App” screen where you are trying to take the picture to focus on it and other content or people on the Camera App will become blurred.
    • Use the blur effect to adjust the blur location until the people in the picture are completely blurred out. Hit the “Shutter” icon to take the picture.

    Only the focus item or person in the picture will be clear while others will be blurred out.

    Blur People’s Faces Using Photos App

    If the people’s faces that you want to take are in a photo you have taken. You can still blur their faces from the picture. However, the Photos App doesn’t have a built-in feature to blur faces but you can use the built-in feature on your iPhone to blur people’s faces from public photos. Here are the steps to take.

    • Open the “Settings App” on your “iPhone.” This is the cogwheel gear icon on your iPhone apps.
    • Locate the “Photos App” in the “Settings” and click on it to open the app configuration.
    • Hit the “Advanced” option on the “Photos App” settings page.
    • Scroll down and go to the “Privacy” section. Locate the “People or Faces” option and turn it on.

    Once this feature is turned on you will be able to blur people’s faces on your iPhones and share the photos without revealing the identity of the people whose faces are blurred.

  • How to Fix Touch ID Not Working On iPhone

    How to Fix Touch ID Not Working On iPhone

    If the only option you have to unlock your iPhone is passcode. What happened to your Touch ID? Well, in this guide, we will delve into how to fix Touch ID not working on your iPhone.

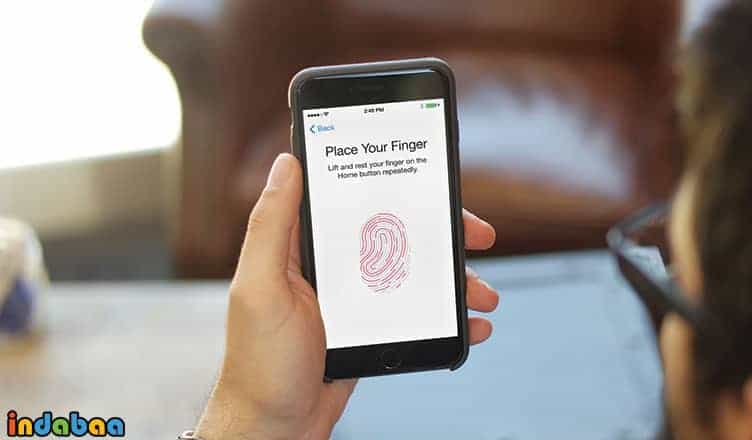
    The iPhone Touch ID is the fastest way to unlock your iPhone without a Face ID. You just need to let your iPhone scan your fingerprint to unlock your device once the fingerprint sensor can confirm it.

    However, a lot can cause your iPhone Touch ID to fail when you try to unlock it. This includes but is not limited to the iPhone touch ID not being unable to capture your full fingerprint for recognition. But if you are sure that your Touch ID was working perfectly before it stopped recognizing your finger you need to take the following actions to resolve the issue.

    You won’t be able to point out exactly why your iPhone Touch ID isn’t working. But you can try different troubleshooting tips to resolve this. These tips include updating your iPhone OS, clearing your iPhone cache, restarting your iPhone, and re-calibrating your Touch ID among others.

    So, in this guide, we will walk you through different approaches to fixing your iPhone Touch ID not working.

    Restart your iPhone

    The first troubleshooting tip to fix your iPhone when malfunctioning is to attempt to restart it to clear all the clogs or if the Touch ID is stuck. However, if you use any of the iPhone models with a Touch ID here are the steps to restart your phone.

    • Press and hold the Home button
    • While you are still holding the Home button press and hold the Sleep/Wake button.
    • Keep holding the “Buttons” until the “Apple Logo” appears.

    Let go off the bottoms and your iPhone will restart. This works for all iPhone with Touch ID.

    Clean the Touch Sensor

    Use a wipe to clean the Touch sensor to see if it’s dirty. If it doesn’t, it could be the reason why the Touch ID isn’t responding to your touch. Then, you need to clean it very well until there is no more dirt and the sensor can recognize your fingerprint.

    Don’t Use a Wet Finger

    Your fingers must all dry at all times if you don’t want to have a problem with your iPhone Touch ID recognition. If by mistake, your finger is wet, you a dried cloth to wipe it and wait for some seconds to completely dry the leftovers until you try to use it again.

    Your Touch ID Finger has an Injury

    If there is a change in your Touch ID finger like an injury or blister your Touch ID won’t recognize it. This is minor though but for a security reason, your Touch ID finger has to match the record on your iPhone. However, if you have multiple fingerprints registered on your iPhone you should consider using a different finger for the Touch ID to see if it works.

    Update your iPhone OS

    If your iPhone OS is outdated it can cause your device to malfunction. Therefore, we recommend that you should always stay ontop of the software update. Here are the steps to check for a new update on your iPhone with or without fingerprint.

    • Open the “Settings App” on your “iPhone.”
    • Hit “General.”
    • Tap “Software Update.”
    • Tap “Download” to download the available software update and install it on your iPhone. You can download the update and install it when your iPhone is inactive like in the middle of the night.

    Delete Existing Fingerprint

    You should consider deleting the existing fingerprints and setting a new one. With this, your iPhone will be able to recognize your fingerprint even if the nature of your fingers has changed.

    However, restart your iPhone before enrolling a new fingerprint. This will make sure that your deleted finger cache won’t interfere with the new enrolments.

    • Open the iPhone “Settings App.”
    • Hit “Passcode & Touch ID.”
    • Click on the “Name” of the fingerprint you want to delete or remove.
    • Select “Delete Fingerprint.”

    You can follow the same procedure to enrol new fingerprints.

    Reset your iPhone Network Settings

    You may think that there is no correlation between your Touch ID and network settings. But there is. Resetting your iPhone network settings can resolve the glitch if none of the steps above work.

    • Open the “Settings” app on your iPhone. You can see that on the home screen or Apps library.
    • Hit “General.”
    • Scroll down to the bottom of the page and hit “Transfer or Reset iPhone.”
    • Hit “Reset” on the screen.
    • Select “Reset Network Settings” from the popup.
    • Enter your “iPhone Passcode” to confirm the selection.
    • Confirm your “Screen Time Passcode” if you are using the passcode on your iPhone to monitor your activities.”

    Once you have confirmed the steps above your iPhone network settings will be reset to the default.

    Reset your iPhone

    It’s advisable to backup your iPhone to either your iCloud account or external storage device and reset your device. Resetting your iPhone to the default or factory settings will erase all your personal configuration to restore the default settings.

    • Go to your iPhone “Settings.” You can access your iPhone settings by clicking on the cogwheel icon on your home screen or App library.
    • Tap “General.”
    • Scroll down and hit “Erase all Content and Settings.”
    • Tap “Continue” under “Erase This iPhone.”
    • Hit “Erase iPhone.”
    • Confirm your “Passcode” to erase and reset your iPhone to the default.

  • How to Clear the Cache on iPhone

    How to Clear the Cache on iPhone

    Too much cache can reduce your iPhone performance and make the device lag. This can make your iPhone apps freeze or stuck when you are using them. However, if it ever crosses your mind to clear the device cache, then you can revive the device and end the lagging issue, so in this guide, you will learn how to clear cache on iPhone.

    However, there is no single-to-do button or action button to clear cache on your iPhone. But the fastest way to get this done is via individual apps on your iPhone such as Instagram, Facebook, YouTube, etc.

    Clearing caches on your iPhone can drastically improve the performance of the device and free of clogs that slow down the phone. Meanwhile, this isn’t a one-time exercise, you need to cultivate the habit of clearing the caches on your iPhone each time you note that the performance is degrading.

    What is the iPhone cache?

    iPhone creates a cache whenever you use the phone. Files are created by applications and contain data that applications use when running.

    You may have heard about a cache related to your web browser. The web browser contains temporary files that speed up download sites. This is a common type of cache, but all kinds of apps and iPhone OS also have a cache.

    Why clear the iPhone Cache?

    It contains the files you need, and in some cases, speeds up your phone. However, there are two main reasons for clearing the iPhone’s cache.

    First, cached files take up storage space on the iPhone, and over time, they are collected. If you want to free up storage space on the iPhone, clearing the cache is one way to do this. Some of this is done automatically by iOS, but you can also do it manually.

    Another reason to clear an iPhone’s cache is that cached files sometimes slow down the phone or cause things to behave in ways you don’t want.

    There are many types of cache on the iPhone. As a result, there is no single step you can take to clear all types of cache.

    How to Clear Cache on iPhone

    The Safari browser should come to mind when talking about how to clear cache on iPhone as the default browser. However, doing this will erase all your search histories from the browser with a single click.

    Here are the steps to take to clear cache on Safari on your iPhone.

    • Open the “Settings” app on your iPhone.
    • Scroll down and hit the “Safari” browser’s icon.
    • Scroll to “Privacy & Security” and tap “Clear History and Website Data.”
    • Select the “Clear Timeframe” and hit “Clear History.”

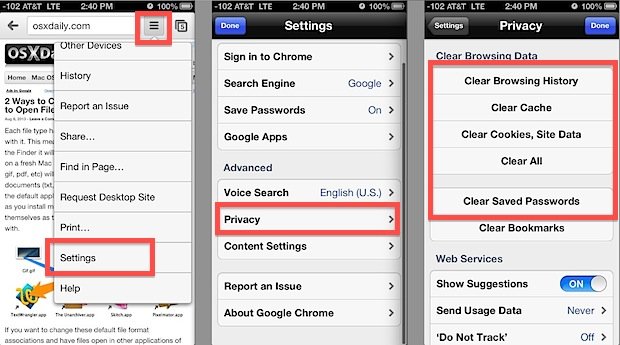
    How to Clear Your iPhone Cache on Chrome

    Apart from the default you can also use the “Chrome” browser. If yes, you need to clear the app cache. Here are the steps to take.

    • Open the “Chrome” browser on your “iPhone Home Screen.”
    • Hit the “three dot” at the bottom right.
    • Tap “Clear Browsing Data.”
    • Choose the “Timeframe” under “Clear Browsing Data.”
    • Select what to clear from the page such as cookies, site data, cached images and files.
    • Click on “Clear Browsing Data.”
    • Hit “Clear Browsing Data” from the popup.

    How to Clear Instagram Cache iPhone

    You need to offload the Instagram app on your iPhone to clear the cache. Once offloaded you then need to download the app again from the App Store. Here are the steps to take.

    • Open the “Settings App” on your iPhone.
    • Tap “General.”
    • Scroll down and hit “iPhone Storage.”
    • Locate and tap “Instagram.”
    • Hit “Offload App.”
    • Tap “Off App” from the popup.

    The steps above will delete the Instagram app from your iPhone and its cache but will keep all your documents and data on the app so that when you reinstall the app the documents and data will be imported.

    How to Reinstall Offloaded Apps

    Here are the steps to take to reinstall offloaded apps on your iPhone

    • Launch the App Store app on your iPhone or iPad.
    • Click the Today tab if it is not already selected.
    • Click on your circular profile image in the upper right of the screen today to access the Account Settings screen
    • Click Purchases.
    • Click on My Purchases.
    • On the purchased screen, click the Not on this iPhone tab.
    • Scroll through the list of purchased applications to find the application you want to restore, then click the cloud download icon next to it to re-download and install.

    As is, iOS still lacks a direct way to clear the app cache. For example, you may sometimes want to keep an app, but you can delete documents and data. Hopefully, Apple will include an equivalent option in a future version of iOS, but until then, the methods outlined above are your best options for clearing cruft from your iPhone.

  • How to Cancel Amazon Prime Subscription

    Amazon Prime Video is an amazing website to stream different kinds of movies on demand across the globe with a 30-day free trial. This is to test the water whether it is worth it or not which allows you to cancel your free trial on or before the end of the time, failure to cancel your trial will lead to Amazon charging your credit or debit card.

    However, if you are struggling to cancel your subscription on the platform this article will address that and put you through how to cancel subscriptions on Amazon Prime Video.

    It’s worth noting that you cannot cancel your subscription on Amazon Prime Video using any device that you linked to your account. This has to be done on the Amazon Prime Video official website to be able to cancel the subscription.

    Meanwhile, Amazon Prime is available on all devices both streaming and smart devices such as Samsung, Apple TV and others.

    Amazon Prime Free Trial

    Amazon offers a 30-day free trial for all regular plans such as family and business plans. While the students’ plan lasts for 60 days and comes with a cheaper rate. However, while creating your Amazon free trial account you will be prompted to choose a payment method and add the payment details [IF] you selected a credit card as your means of payment.

    Meanwhile, after the free trial, Amazon will charge you for the plan you selected. So, you must proceed to your Amazon account settings to cancel your subscription before the trial period ends or before the end of the active subscription.

    How to Find Membership Expiry Date

    Should you choose to wait for Amazon to update you when your membership expires you might not have enough time to cancel your subscription and this will lead to Amazon Prime Video charging you for the month. However, it is worth it to know when the membership will expire.

    • Go to the Amazon account page and log into your membership account.
    • Hover your mouse pointer to your account profile with the message and select your Account.
    • Select Prime from the options available.
    • A new page will come up detailing your Amazon Prime membership expiry date.

    With this, you will know exactly when your Prime membership will expire and when it’s the right time to terminate your Prime membership on Amazon.

    How to Cancel Subscriptions on Amazon Prime Video

    You can only cancel your Amazon Prime Video subscription directly from your account dashboard. Here are the steps to take.

    • Go to the Amazon Prime Supports page.
    • Click End Membership on the  End Your Amazon Prime Membership page.
    • Sign in to your Amazon Prime free trial or paid account with your login credentials.
    • Click “Continue to Cancel”?.
    • Click “End Now”?.
    • Click “Cancel” on the Cancellation page.
    • Done.

    That is all you have to do to terminate your subscription on Amazon Prime. Meanwhile, your account will be active until the end of the billing cycle.

    How to Cancel Amazon Prime Video Subscription on Mobile

    If you are using either the Amazon Prime app for Android or iOS you can equally find your way around it and cancel or upgrade your membership before the end of the active membership.

    • Open the Amazon app on your phone.
    • Click on the Menu button.
    • Select your Account from the new page.
    • Navigate to Account Settings.
    • Click on Manage Membership.
    • Log in to your Amazon Prime account using your email and password.
    • Click on End Membership for paid subscribers or End Free Trial for free trial users.
    • Select Cancel my Benefits from the options.
    • Click on End Now.
    • Done

    How to cancel your Amazon Prime Subscription through Prime Video

    By default the steps above will help cancel your Amazon Prime subscription. However, if you are trying to cancel the subscription via the Prime Video website you will be redirected to the Amazon page. If this is confusing you may want to take the following steps.

    • You first need to log into your Prime Video account before you can be redirected to your Amazon account to cancel your subscription.
    • Hit your Account Profile icon at the top right to open the dashboard menu.
    • Click Account & Settings from the menu.
    • Locate the Prime Membership on the Account & Settings page.
    • Hit Edit on Amazon on your Prime membership tab to redirect you to your Amazon account where you will be able to cancel the Prime subscription.
    • Once you are on the Amazon page you should follow the steps above to cancel your Amazon Prime Video subscription from your Amazon account.

    How to Cancel Amazon Prime Video Add-on

    If you have some add-ons added to your Amazon Prime Video and would love to cancel them all before the next billing cycle here are the steps to take.

    • Open your browser and go to the Prime Video subscription page.
    • Sign into your Amazon account using your username and password.
    • Go to Your Channel and hit Cancel Channel next to the subscription you want to end.
    • Follow the onscreen instructions to confirm that you want to cancel the selected channel. You will be persuaded not to go with different offers but if you have determined to end the subscription click Confirm.

    Your Amazon free membership plan should end now. However, If your membership expiry date is in a few days. The subscription will be valid until then but you will not be charged without deleting your credit card or payment details.